Copying a single RPM or DEB file to an offline server can leave its dependencies unresolved. A package such as jq also needs compatible libraries. Prepare a local repository so the client can resolve the required package set through its normal package manager.
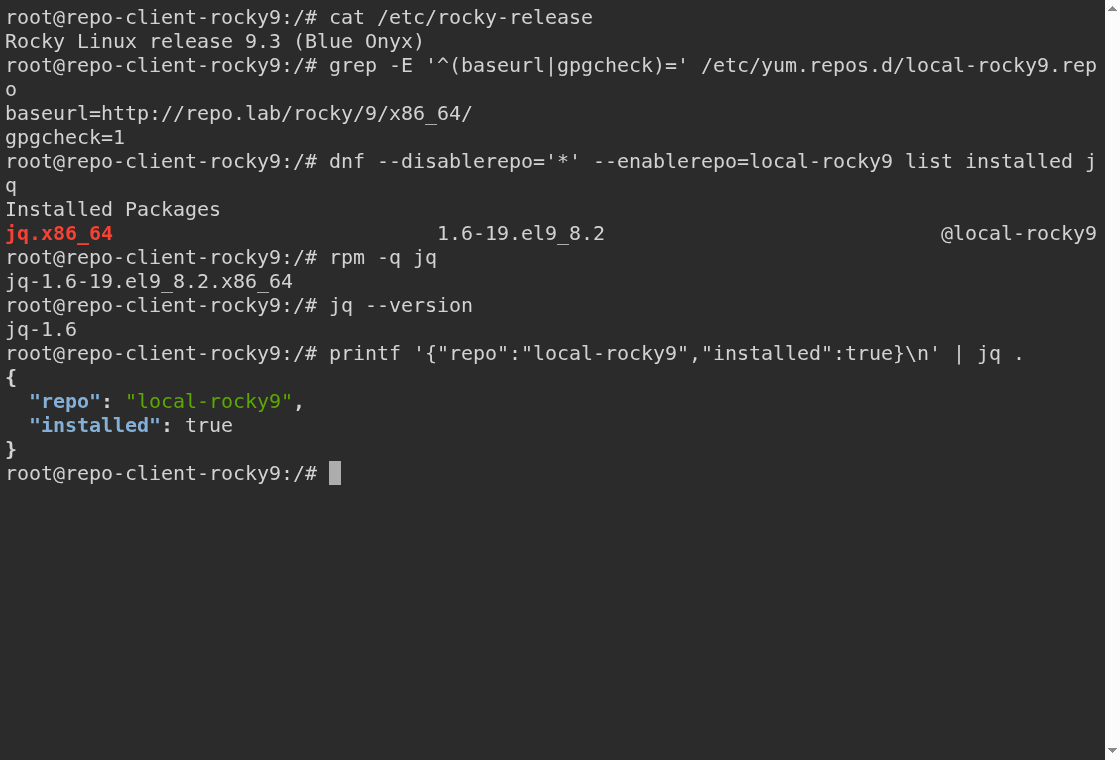
We organized the process of collecting packages from Rocky Linux 9 and Ubuntu 24.04·26.04 and installing them through the internal HTTP repository. An example is jq, a tool for manipulating JSON, and , an optional package repository, , containing its dependencies. We confirmed the actual installation in three environments, and the terminal image below is a screen capture of the exercise.
On this page
Package warehouses also require inventory lists
The package file is the product on display, and the metadata is an inventory list of what product and version are available. DNF and APT read this list and pick the files and dependencies they need. The HTTP server corresponds to the entrance to the store. If you don’t just create a folder to put the files in and make a list of them, the package manager won’t be able to find out what you have in stock.
Rocky uses RPM files and repodata/. Ubuntu’s small flat repositories use DEB files and the signed Packages.gz, Release, and InRelease. Since the package format and method of verifying trust are different for each distribution, they should not be stored all at once in the same folder.
Configuration and supplies: Divide the collection server and client
The party collecting the package must have access to the Internet. The client you install only needs to have access to internal storage. If it is a completely closed network, the files are collected from an external environment with the same distribution, version, and architecture, and then delivered to the storage server through an approved import procedure. The public root is /var/www/html/repos, and the path under it is divided as follows.
| Target OS | Subpath of public root |
|---|---|
| Rocky Linux 9 | rocky/9/x86_64/ |
| Ubuntu 24.04 — noble | ubuntu/noble/ |
| Ubuntu 26.04 — resolute | ubuntu/resolute/ |
The example server name is repo.lab and the IP is 192.168.10.10. This IP is for illustration purposes only; replace it with your actual storage server address. Set repo.lab to be resolved to the server in DNS or /etc/hosts, and check with getent hosts repo.lab on the client first. In our lab, we gave each isolated Docker network this name.
The commands are based on root-privileged Bash shell on the dedicated lab server. If necessary, switch to sudo -i and run the storage server and client tasks separately. The architecture was set to Rocky’s x86_64 and Ubuntu’s amd64. If you use a different architecture, you will also need to change the package collection environment and settings.
Create an HTTP inlet to the repository server
First install the repository tools and Nginx. Run only the command group matching the repository server’s OS. If that server is already disconnected, prepare these tools before the transfer as well.
# Rocky Linux 9 저장소 서버
dnf -y install dnf-plugins-core createrepo_c nginx
# Ubuntu 24.04 또는 26.04 저장소 서버
apt-get update
apt-get install -y apt-utils dpkg-dev gnupg nginx ca-certificates curlNginx serves the files under /var/www/html/repos. Replace 192.168.10.10 with the actual server IP and set it on a dedicated lab server with no other sites. If you are running an existing Nginx, first check whether there is an address/port conflict with the current virtual host.
install -d -m 0755 /var/www/html/repos

cat > /etc/nginx/conf.d/local-repo.conf <<'EOF'
server {
    listen 80;
    server_name repo.lab 192.168.10.10;
    root /var/www/html/repos;

    location / {
        try_files $uri $uri/ =404;
    }
}
EOF

nginx -t
systemctl enable --now nginx
systemctl reload nginx
In regular VMs or servers, it is managed with systemd as above. In this container exercise, nginx was run directly instead of systemd. If you use a firewall, allow access to TCP 80 on the storage server from the actual client band. The operating network also determines the access range and HTTPS application. (Nginx official static file provision information)
If SELinux is enabled in Rocky, restore the default context for this path with restorecon -Rv /var/www/html/repos after moving the file. If you used a separate disk or other public path, you will also need to set up a persistent context for that path. Access is blocked by turning off SELinux first.
Rocky Linux 9: Collect RPMs and Dependencies Together
Storage server — collects packages and creates inventories
The option to take note of here is --resolve --alldeps. Just use --resolve to skip dependencies that are already installed on the collection server. We also use --alldeps to collect those dependencies. --arch was limited to the target x86_64 and the common package noarch. (DNF download official document)
REPO=/var/www/html/repos/rocky/9/x86_64
install -d -m 0755 "$REPO"

dnf download --resolve --alldeps \
  --arch=x86_64,noarch \
  --destdir="$REPO" jq

rpmkeys --checksig "$REPO"/*.rpm
createrepo_c "$REPO"

curl -I http://repo.lab/rocky/9/x86_64/repodata/repomd.xml
View the signature verification result at rpmkeys, and verify that the last HTTP request is 200 OK. If you can download repomd.xml, you have created the entry point to the DNF read list. It is more accurate to check the actual metadata URL than to just see the first screen of the directory open.
This example redistributes an official RPM verbatim, thus retaining the RPM’s original signature. createrepo_c creates an inventory list and is not a tool to re-sign the RPM itself. If you distribute your own RPM, you will also design the signature and public key distribution of the RPM separately.
Client — install using local repositories only
The file below is created on Rocky Linux 9 client. We will leave the default as enabled=0 and turn on the specified repository only for testing purposes. You can see where you installed it from without deleting your existing repository files.
cat > /etc/yum.repos.d/local-rocky9.repo <<'EOF'
[local-rocky9]
name=MaruOps Rocky Linux 9 Local Repository
baseurl=http://repo.lab/rocky/9/x86_64/
enabled=0
gpgcheck=1
gpgkey=file:///etc/pki/rpm-gpg/RPM-GPG-KEY-Rocky-9
EOF

dnf --disablerepo='*' --enablerepo=local-rocky9 makecache
dnf --disablerepo='*' --enablerepo=local-rocky9 install -y jq
dnf --disablerepo='*' --enablerepo=local-rocky9 list installed jq
jq --version
gpgcheck=1 checks the signature of the RPM being installed. The example uses the official public key included with Rocky 9. If you see @local-rocky9 in the last list, you can confirm that you installed it to internal storage. In this configuration provided via HTTP, no separate signing of the storage metadata itself was configured.
Ubuntu 24.04·26.04: Collect DEBs by release
Storage Server — Uses the code name of the current OS
In 24.04, you should get noble, and in 26.04, you should get resolute. The command structure is the same, but must be executed separately in the collection environment for each release. Changing the URL name from noble to resolute is not an operating system switch or package conversion.
. /etc/os-release
CODENAME="$VERSION_CODENAME"
ARCH=$(dpkg --print-architecture)
printf 'release=%s architecture=%s\n' "$CODENAME" "$ARCH"

REPO=/var/www/html/repos/ubuntu/$CODENAME
CACHE=/var/tmp/localrepo-$CODENAME
install -d -m 0755 "$REPO/pool" "$CACHE"
install -d -o _apt -g root -m 0700 "$CACHE/partial"

apt-get --download-only --no-install-recommends -y \
  -o Dir::State::status=/dev/null \
  -o Dir::Cache::archives="$CACHE" \
  install jq

cp "$CACHE"/*.deb "$REPO/pool/"
Dir::State::status=/dev/null causes the installed package list in this download operation to be treated as empty. This setting is intended to include libraries that already exist on the collection server in the dependency calculation, and is not a command to actually clear /var/lib/dpkg/status. Since --download-only, this step collects the package without installing it. (APT command and option)
--no-install-recommends is a choice for creating small examples with only required dependencies. If your application also requires recommended packages, adjust this option in both collection and installation. Since it does not calculate all environments for the target server, including version fixation, additional repositories, and installed package combinations, it is tested in the same environment as the actual target before importing.
Storage server — prepare the signing key
Ubuntu follows a signed list of repositories to verify package integrity. Rather than putting in trusted=yes to avoid an error, let’s create a key for this repository to use and connect it to Signed-By on the client. Private keys are stored outside the public web directory. (APT repository authentication structure)
The following command is run the first time from an empty private key directory. Set a protection password during the key creation process and use it for subsequent signing. If you continue in the same shell, the values of KEYHOME, REPO, and CODENAME will be maintained.
KEYHOME=/root/localrepo-gnupg
install -d -m 0700 "$KEYHOME"

gpg --homedir "$KEYHOME" --quick-generate-key \
  "Local Repository ($CODENAME) <repo@example.invalid>" \
  rsa3072 sign 1y

gpg --homedir "$KEYHOME" --fingerprint
gpg --homedir "$KEYHOME" --armor --export > /tmp/local-repo.asc
/tmp/local-repo.asc is the public key to be passed to the client. The key’s fingerprint is compared to a separate trust path, and only files confirmed by the administrator are delivered. The KEYHOME directory containing the private key is not copied to the web path. Disposal keys were used to automate the exercise; key fingerprints visible in the capture should not be used as your own operating keys. (GnuPG key management document)
Storage server — creates and signs the list
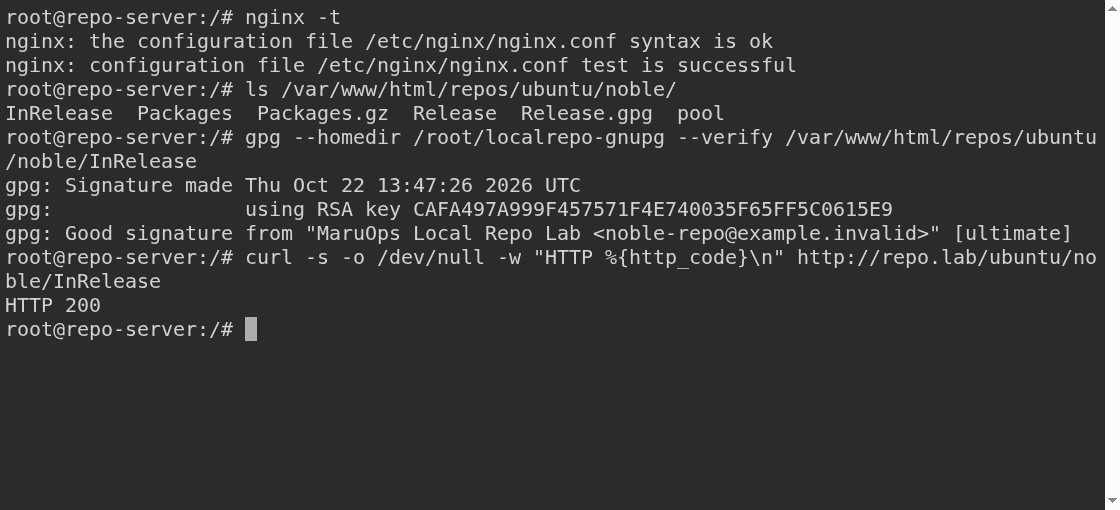
Create and compress the Packages index from the DEB files, generate Release with the index hashes, then sign it. Creating Packages.gz alone does not finish a signed repository.
cd "$REPO"
dpkg-scanpackages --multiversion pool /dev/null > Packages
gzip -9fk Packages

apt-ftparchive \
  -o APT::FTPArchive::Release::Origin=MaruOps-Lab \
  -o APT::FTPArchive::Release::Label=MaruOps-Local-Repo \
  -o APT::FTPArchive::Release::Architectures="$ARCH" \
  release . > Release

gpg --homedir "$KEYHOME" --clearsign --output InRelease Release
gpg --homedir "$KEYHOME" --armor --detach-sign \
  --output Release.gpg Release

gpg --homedir "$KEYHOME" --verify InRelease
curl -I "http://repo.lab/ubuntu/$CODENAME/InRelease"
This is the command when first created. dpkg-scanpackages generates a package list, and apt-ftparchive release generates a Release file with checksums. Verify that signature verification succeeds and an HTTP 200 response is returned from the actual URL. (dpkg-scanpackages, apt-ftparchive)
Verify signature and install on Ubuntu client
Now navigate to the Ubuntu server you want to install on. Proceed with the assumption that the public key confirmed and delivered by the administrator is in /tmp/local-repo.asc. The key file is installed as 0644 so that even APT’s limited-privilege users can read it.
. /etc/os-release
CODENAME="$VERSION_CODENAME"
ARCH=$(dpkg --print-architecture)

install -d -m 0755 /etc/apt/keyrings
install -m 0644 /tmp/local-repo.asc /etc/apt/keyrings/local-repo.asc

cat > /etc/apt/sources.list.d/local-repo.sources <<EOF
Types: deb
URIs: http://repo.lab/ubuntu/$CODENAME/
Suites: ./
Architectures: $ARCH
Signed-By: /etc/apt/keyrings/local-repo.asc
EOF
This example is a flat repository that does not create the dists/ structure, so it uses Suites: ./ and does not put the Components entry. noble and resolute are distinguished in the URL directory. The multi-line format of the .sources file is called the deb822 format. (APT sources.list format and Signed-By)
In this verification, an option was specified in the command to not use external storage. Array is a Bash syntax to avoid repeatedly entering two long options. The same options must be applied to both update and install.
APT_LOCAL=(
  -o Dir::Etc::sourcelist=sources.list.d/local-repo.sources
  -o Dir::Etc::sourceparts=-
)

apt-get "${APT_LOCAL[@]}" update
apt-get "${APT_LOCAL[@]}" --no-install-recommends install -y jq
apt-cache "${APT_LOCAL[@]}" policy jq
jq --version
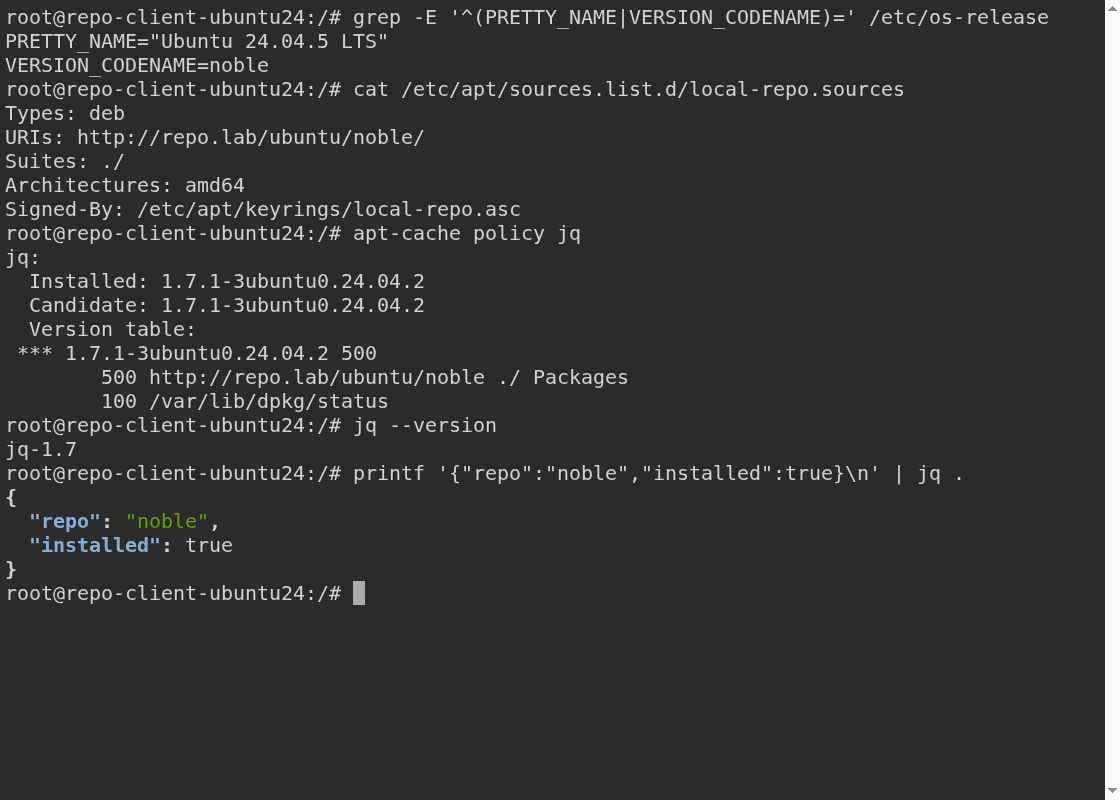
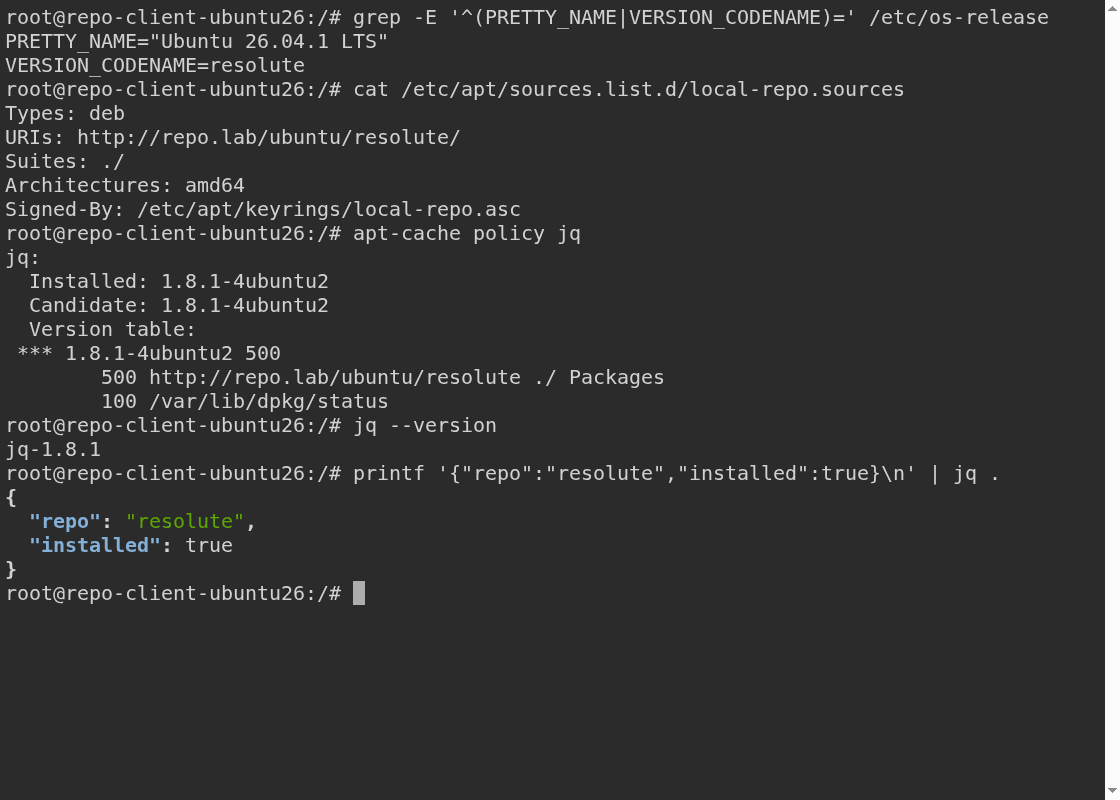
In apt-cache policy jq, check if you see the installed version and http://repo.lab/ubuntu/noble or http://repo.lab/ubuntu/resolute. You must also check that it is updated without a signature error, that the package is installed, and that it runs. The fact that you registered an address is different from the fact that it was actually installed from that repository.
Results confirmed in three environments
As of October 22, 2026, the following configurations have been tested: The new client only connected to Docker’s internal private network and used the HTTP repository within it to install jq. The number of files is a result of collecting the dependencies of the selected jq, not the total number of packages in your distribution.
| Lab environment | Files collected | Check installation source |
|---|---|---|
| Rocky Linux 9 | 17 RPMs | @local-rocky9 |
| Ubuntu 24.04 | 6 DEBs | /ubuntu/noble |
| Ubuntu 26.04 | 7 DEBs | /ubuntu/resolute |
The two folders in Ubuntu are not the same repository, only the commands look similar. Even in this collection, the number of package files and installed versions were different. As the number of verification targets increases, it is a good idea to repeat the same installation test for each distribution, release, and architecture and import the passed bundle.
When stuck, look in the order of warehouse, list, and trust.
The file exists, but I get a dependency error.
First, check whether you only copied the RPM or DEB to be installed. For Rocky, check --resolve --alldeps, for Ubuntu, check the installation status and recommended package options at the time of collection. Next, we contrast releases and architectures. In particular, moving the DEB for Ubuntu 24.04 to the 26.04 repository folder does not make it a 26.04 package.
404 or 403 appears
Rocky requests the actual URL repodata/repomd.xml, Ubuntu requests the actual URL InRelease. If it is 404, check whether the path, virtual host, and list are created, and if it is 403, check the directory access permissions, SELinux context, and Nginx access settings. Even if the site root is 403, it may be a normal configuration where the directory list is private, so try to pinpoint the file URL you want to check.
Key or signature error occurs in Ubuntu
Check Signed-By‘s file path and public key read permissions, and check whether the server actually signed with that key. We also look at cases in which the old InRelease was provided as is after changing the package list. At this time, if you hide the warning with trusted=yes or the authentication bypass option, it becomes difficult to find the cause.
When you add a package or need a full mirror
The local repository is frozen at the point of copying. Even if security updates are released externally, internal inventory does not change automatically. Collection dates and package versions should be recorded, and a schedule for validating and replacing new batches should be established.
If you added the RPM to Rocky’s optional package repository, update the metadata as well. The following commands were also executed and confirmed in the lab. The client receives the repository metadata again and verifies that the new package is visible.
# 저장소 서버
createrepo_c --update /var/www/html/repos/rocky/9/x86_64
Next, we update the cache on the Rocky client.
# Rocky 클라이언트
dnf --disablerepo='*' --enablerepo=local-rocky9 --refresh makecache
Ubuntu updates the Packages·Packages.gz·Release·signature files together after changing the DEB file. In operation, do not immediately overwrite the public directory, but create and verify it in a separate staging directory and then convert it, so that lists and files from different times are not mixed.
If you manage multiple servers with constantly changing packages to install, a full or scoped mirror may make more sense than a collection of optional packages. Rocky’s reposync --download-metadata even pulls in the original metadata, so you don’t need to run createrepo_c on the result again. It also takes into account items that might be missed by simple regeneration, such as module information or package groups from the original AppStream. (DNF reposync official document)
The Ubuntu full mirror is planned by distinguishing not only noble·resolute, but also update/security update areas, components, and architecture. The official documentation also describes installation ISO mirrors and package archive mirrors separately. A single installation ISO should not be considered the most up-to-date package repository for your entire distribution. This article does not implement full mirror synchronization or ISO mounting methods. (Ubuntu package archive structure)
Start small with just one tool and its dependencies. Once you’ve gone through the flow of downloading a file, creating a list, verifying trust, and then installing it on an internal client, you’ll know where to look when increasing a package.
Verification environment and reference materials
For verification, we used Rocky Linux 9.3-based containers and Ubuntu 24.04.5 LTS·26.04.1 LTS containers. Verified package collection, metadata creation, Rocky RPM signature verification, Ubuntu repository signature/APT verification, and jq installation/execution via internal HTTP on x86_64/amd64. The automatic start of systemd in the VM and the firewall/SELinux policy of the actual network are not included in the verification scope of this container exercise.
The screenshot captured the actual terminal connected to the running container. Click on the image to view the original. Example addresses, settings, and commands are also provided in the text.
- DNF download — Dependency collection options
- createrepo_c — RPM repository metadata
- DNF reposync — Synchronize source repository
- APT apt-get — Download and installation options
- dpkg-scanpackages — Create a list of Packages
- apt-ftparchive — Create Release
- APT apt-secure — Repository authentication
- APT sources.list — Signed-By with deb822
- Ubuntu official package archive description