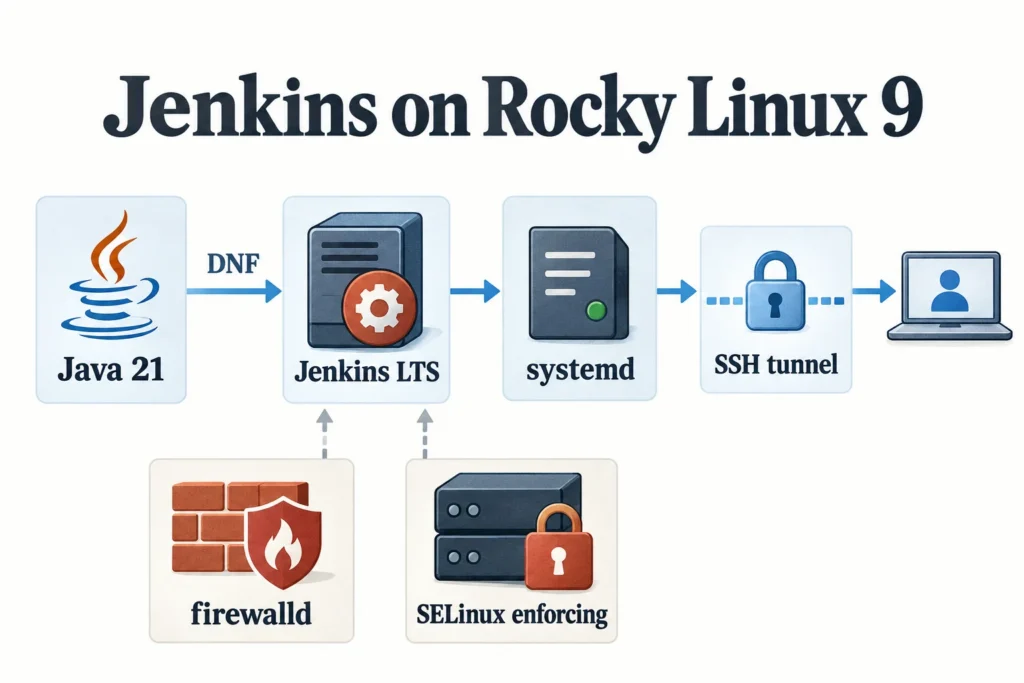
On Rocky Linux, Jenkins installation problems often come from Java selection, repository signing, service ports or firewall access. Check those areas separately so a service access problem does not turn into disabling security controls. This guide follows the package installation through the first web connection.
The installation target is a separate VM running a supported Rocky Linux 9 release. If you start from a 9.6 ISO, apply security updates from the normal 9.x repositories. This guide does not pin outdated packages from a particular minor release. For Ubuntu, use Part 01: Ubuntu installation.
Getting started with Jenkins · 01 Installing Ubuntu · 02 Installing Rocky Linux 9 · 03 First job and Pipeline · 04 Utilizing automation
On this page
What changes in Rocky Linux
| Category | Methods used in this article |
|---|---|
| package | DNF and Jenkins official rpm-stable repository |
| Java | java-21-openjdk and fontconfig |
| service | systemd drop-in. Do not use /etc/sysconfig/jenkins as a starting point for configuration |
| security | Maintain SELinux Enforcing, check firewalld active zone |
| browser | Connect to server internal 127.0.0.1:8080 via SSH tunnel |
| learning resources | Starting value: 2 vCPU, RAM 4GB, disk 50GB. Builds run on separate agents |
1. Check version, time, and resources
cat /etc/rocky-release
uname -m
timedatectl status
df -h /
free -h
getenforce
sudo dnf check-update
dnf check-update may return exit code 100 if an update is available. Don’t immediately assume that something that looks like an error in the shell is a storage failure. OS updates and reboots are completed first by checking VM snapshots, existing services, and operation times. Here we continue with the Jenkins installation, with the updates on the new training VM cleaned up.
2. Prepare Java 21 and the official RPM repository
sudo dnf install -y ca-certificates curl fontconfig java-21-openjdk git
java -version
sudo curl -fsSLo /etc/yum.repos.d/jenkins.repo \
  https://pkg.jenkins.io/rpm-stable/jenkins.repo
sudo dnf --refresh info jenkins
The current official jenkins.repo turns on signature checking of packages and repository metadata. If a message asking you to retrieve the key appears, check the source and fingerprint before proceeding. The actual file can be found in official RPM repository settings. The method of going to --nogpgcheck during installation is not used in this article.
Currently supported runtimes are selected based on the Java support policy Java support policy. This series uses OpenJDK 21, and Jenkins LTS, confirmed on October 18, 2026, is 2.580.1. If you follow along later, check back in the LTS changelog for the version at that time.
3. Limit the listen address and start the service
Instead of exposing the controller’s number 8080 directly to the outside of the VM, bind it only to loopback. Create a drop-in before installing the package for the first time.
sudo install -d -m 0755 /etc/systemd/system/jenkins.service.d
sudo tee /etc/systemd/system/jenkins.service.d/override.conf >/dev/null <<'EOF'
[Service]
Environment="JENKINS_LISTEN_ADDRESS=127.0.0.1"
EOF
sudo dnf install jenkins
rpm -q jenkinssudo systemctl daemon-reload
sudo systemctl enable --now jenkins
sudo systemctl restart jenkins
sudo systemctl status jenkins --no-pager -l
sudo ss -ltnp '( sport = :8080 )'Check whether the server listens for 127.0.0.1:8080. Even if java -version is correct, startup may fail if the service is using a separate Java path, so view the log and systemctl cat jenkins together. The DNF installation flow is based on Jenkins’ RHEL series installation guide.
4. Connect while maintaining firewalld and SELinux.
sudo systemctl is-active firewalld
sudo firewall-cmd --get-active-zones
sudo firewall-cmd --list-all
getenforce
In the SSH tunnel method, all you need is the VM’s SSH connection path and there is no need to open Jenkins’ number 8080. Since the active zone and default zone may be different, also check the actual interface zone shown in --get-active-zones. If the server does not have a firewall installed or is disabled, first check the current network perimeter and SSH access policy.
Open the following tunnel on your PC and connect to http://127.0.0.1:18080. Example accounts/addresses must be replaced with actual values.
ssh -N -L 18080:127.0.0.1:8080 labadmin@192.168.56.20Do not start with setenforce 0 merely because the browser page does not open. Check the local HTTP response, SSH forwarding, firewall and SELinux denials in that order. If a denial exists, identify which process accessed which file or port before deciding what policy is needed.
curl -I http://127.0.0.1:8080/login
sudo journalctl -u jenkins -b -n 100 --no-pager
sudo ausearch -m AVC,USER_AVC -ts recent
ausearch is used in environments where the audit tool is present. If there is no command, it first checks the audit package and service status. Just because there is no rejection record doesn’t mean you can be sure that your overall security settings are correct. For information on how to deal with SELinux, please refer to RHEL 9 SELinux troubleshooting document .
When you need to connect directly from the LAN
The following is an optional configuration for direct access from a management network instead of an SSH tunnel. With JENKINS_LISTEN_ADDRESS=127.0.0.1, opening the firewall alone does not enable remote access. Plan the management IP listen address and access rules together.
sudo firewall-cmd --zone=public --permanent \
  --add-rich-rule='rule family="ipv4" source address="192.168.56.0/24" port port="8080" protocol="tcp" accept'
sudo firewall-cmd --reload
sudo firewall-cmd --zone=public --list-rich-rules
Replace public with the zone of the actual interface and 192.168.56.0/24 with the management network you want to allow. This rule is an IPv4 example and does not replace IPv6 policy. Handle HTTP direct access only on an isolated training network, and operate the joint use environment with an address equipped with an HTTPS reverse proxy and login/permission policy. The rule grammar can be found in firewalld rich language document .
5. Complete the initial setup and check the execution account.
sudo cat /var/lib/jenkins/secrets/initialAdminPassword
sudo systemctl show jenkins -p User -p Group
sudo ls -ld /var/lib/jenkins- Enter the initial password in the Unlock Jenkins screen.
- After installing the recommended plugin, create a separate administrator account.
- Check if the Git·Pipeline·SSH Build Agents·Credentials Binding plugin exists.
- The first task runs after configuring the first task 03 and the agent for Pipeline.
Please note that the service runs under the jenkins account. In the terminal’s administrator account, the files being read may have different paths and ownership, unless they are only read by the task. Applying chmod -R 777 to resolve this will open permissions wider than the cause.
Clues to look for first in error messages
| Message/Status | What to check |
|---|---|
| No valid Java found | Supported Java versions, JAVA_HOME·JENKINS_JAVA_CMD in service |
| Address already in use | 8080 listen process. Change Jenkins port and tunnel destination together if necessary |
| Repository signature verification failed | Official repo file, signing key, time, proxy cache. Do not turn off verification |
| Browser connection only fails | Is it a loopback binding or did you open an SSH tunnel on your PC? |
| File Permission denied | jenkins user permissions and AVC history. Check general file permissions and SELinux separately |
Even after installation, build commands follow the permissions of the agent account running the job, not root. We will see this boundary in action in the next article.